Airtightness Test Preparation: Get Your Site Ready
Getting a new build or property renovation through an airtightness test can feel like a big step, especially if it’s your first time. At Ratio Seven, we help builders, contractors and self-builders pass their airtightness test with the right preparation.
In this guide, we’ll show you how to prepare your site properly, spot potential trouble areas, and steer clear of delays and extra costs. Airtightness test preparation isn’t something you do at the last minute. It’s a process that runs alongside your build, from the early stages all the way to sealing up before test day. Let’s take a look at how to get your site ready for testing without any surprises.
Why Preparing for Airtightness Testing Really Matters
Airtightness testing checks how much air leaks in or out of a building. This directly affects a building’s heat performance and energy use. To meet Building Regulations, especially Part L, the building needs to achieve a target air permeability rate.
If this test fails, your building might need temporary stops in work, re-sealing of joints, and then scheduling a re-test, all of which take time and money. Good airtightness keeps heated or cooled air inside, lowers bills, helps reduce carbon emissions, supports your SAP calculations, and creates a more comfortable space.
Whether you’re working on a high-spec home or a housing development project, airtightness testing shouldn’t be left to the final week. Planning is half the battle won.
Airtightness Test Preparation: When and How to Start
Get the Timing Right
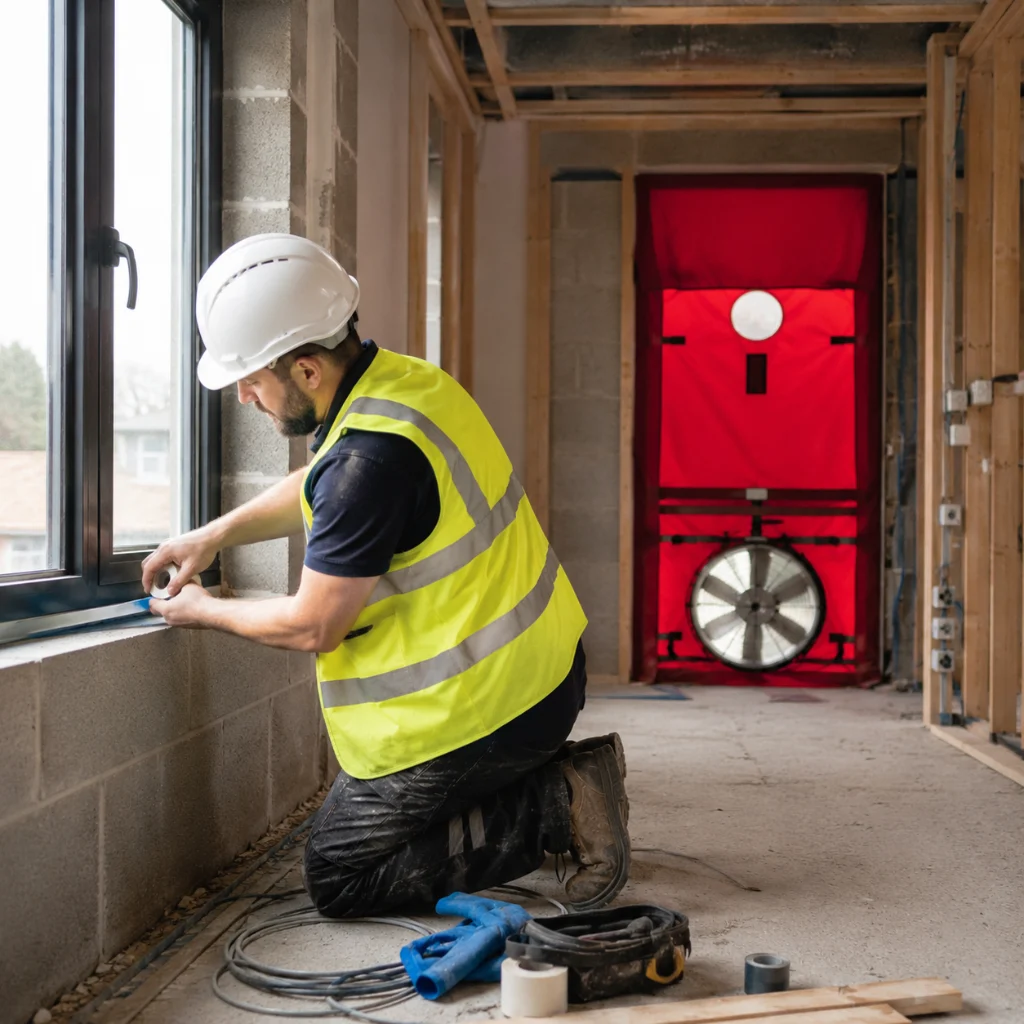
The best time to carry out the test is when the building is externally complete. That means doors and windows are fitted and can close solidly. Internally, most finishes should be in place, with obvious penetrations sealed.
As you prepare your schedule, talk to your airtightness testing provider early. At Ratio Seven, we often help clients plan test dates around project completions to avoid delays. Site access, power availability, and even the weather can affect the test, so coordinate everything in good time.
Complete These Steps Before Test Day
- Seal the Building Envelope: Roofs pitched or flat, walls, and ground floors must be finished with no gaps or visible holes.
- Close Service Penetrations: Pipes, cables, and ducts all pierce the building envelope. All those small access points need sealing, using mastic, proprietary grommets, or airtight collars.
- Install Ashes, Windows, Doors and Panels: Windows and doors must shut tightly, without warping or damaged seals. If you’ve got a loft hatch or underfloor inspection point, it must also be in place and sealed.
- Complete Internal Finishes: Skirts, sockets, plastering, and wall linings should be in place. Any cabling or service lines leaving holes around them? Seal them.
- Prepare Ventilation & Plumbing: Temporarily block active mechanical vents by taping or inserting expandable foam. Water traps in drains must be filled to cap off airflow.
Building Air Leakage Detection: Know the Usual Weak Spots
Focus on High-Risk Areas
Certain parts of buildings often let air through, even if they look solid.
These include:
- Gaps around windows and doors
- Floor-to-wall and wall-to-roof joins
- Where wiring passes through walls
- Loft access doors and attic eaves
- Behind kitchen units and bath panels
- Boiler flues or extractor hood vents
Installing services can create gaps that become invisible beneath finishes. These weak spots are where air escapes and where your airtightness rating can take a hit.
Look for older gaps that might not have been plugged or freshly drilled holes. Seal these with expanding foam, acrylic mastic, or other vapour control products before testing.
Use Early Inspection Tools
A visual check is usually enough at first. A handheld torch and a sharp eye can catch a lot. For more thorough checks, some teams use a basic smoke pencil during a walkaround or place plastic sheeting in doorways to feel for draft movement.
In more advanced builds or commercial projects, infrared thermography cameras can help reveal temperature differences where air escapes, especially in hard-to-reach areas.
Airtightness Test Preparation: Steps to Avoid Failing
Falling short on an airtightness test can lead to failed completions, extra labour, and wasted days. Retesting means calling your airtightness team back in, resealing areas, dealing with trades already moving onto other projects, and trying again.
To avoid that:
- Walk through the entire home before the test with punch-out tape to flag problem spots for resealing.
- Use checklists to cover areas commonly overlooked during final finishes.
- Don’t wait until testing day to close things up. If a window doesn’t latch properly or a pipe is left unsealed, the building can’t perform well under pressure tests.
A failed test doesn’t mean disaster. It means the building envelope didn’t hold pressured air within the allowed leakage rate. We’ll highlight the weak points after failure so you can seal them, but it’s always cheaper and faster to seal them beforehand.
Learn from Every Test You Do
The test result is usually given as a figure in m³/h.m². The lower the number, the better the seal. But that number also reflects the standard and accuracy of workmanship throughout the building.
If the result was worse than hoped, it’s a clear flag that sealing work either missed a patch or wasn’t effective. Tight sealing around sockets, frame junctions, or ducts might need upgrading next time.
Repeat customers at Ratio Seven often tell us they’ve improved build methods based on airtightness reports. That feedback loop makes each future build tighter from frame to finish.

Building Air Leakage Detection: Simple Checks That Work
Even if you’re short on time, some last-minute checks help pinpoint common spots where air slips through:
- Run your hand along skirting boards and architraves
- Look behind fixed features such as sinks or WC boxing
- Examine suspended floors or beam pocket entry points
- Peer behind consumer units or distribution boards
- Flash a light through known roof joint lines
If there’s any sign of air movement or visible gaps, seal it now. A bit of quick action can make the difference between a pass and a delay.
You can also check our air testing FAQs for more information on what to expect.
Final Steps and Checklist for Airtightness Success
Before calling your airtightness engineer, there are a few things we recommend covering off completely. Keep this short checklist handy during final build stages:
- Are windows and doors fully installed and able to shut tight?
- Are the visible holes around services sealed?
- Are plumbing traps filled and ventilation systems capped?
- Are internal wall finishes complete with no visible gaps?
- Was the building cleaned out and cleared of debris to allow the engineers full access?
- Have temporary seals been installed where needed?
Having a reliable testing partner like Ratio Seven helps everything go smoothly. Our testers conduct air pressure tests across the UK, and we’re always happy to schedule a date that suits you or answer questions about the airtightness process.
Airtightness Test Preparation: Why It Pays Off
Whether you’re working toward SAP compliance, meeting building regulations, or improving occupant comfort, airtightness tests are a non-negotiable part of the build path.
To pass, a building must be ready, sealed and finished to a solid standard. Rushing these steps or leaving sealing work as an afterthought only leads to costly corrections, waiting around for retests, and lower long-term performance.
Instead, build airtightness test preparation into your timeline from the start. A clean, sealed, and carefully inspected site improves your chances of passing the first time and moves your project forward smoothly.
Need help planning your airtightness test? The Ratio Seven team is here to help with quotes, questions, and booking support. You can contact us here.
A successful test means:
- Better heating and cooling performance all year round
- Stronger compliance with Part L of the Building Regulations
- Fewer post-build surprises
- Higher overall property value
- Lower lifetime energy use
Make airtightness a goal built into every step. Don’t just wait for the test, prepare for it properly.